How to Safely Clip Your Pet Bird’s Wings at Home
Clipping your bird’s wings is one of those tasks that sounds scarier than it actually is.
If you have ever stood in front of your feathered companion holding a pair of scissors, heart pounding like you are about to perform surgery, you are not alone.
Most bird owners feel that way the first time. The good news? With the right preparation and a calm hand, you can do this safely at home without traumatizing yourself or your bird.
Before we get into the how-to, let’s be clear about one thing: wing clipping is not cruel.
Done correctly, it is a practical safety measure that keeps your bird from flying into windows, escaping through open doors, or landing in a pot of boiling soup.
Yes, that last one actually happens more than people admit.
What Wing Clipping Actually Does (and Does Not Do)
A lot of people assume that clipping a bird’s wings means the bird can never fly again. That is not accurate.
Wing clipping reduces a bird’s ability to gain altitude and fly long distances. It does not ground the bird completely, and it does not cause pain when done properly.
Think of it less like cutting off a limb and more like trimming a sail.
The bird can still glide, flutter, and get around, but it cannot take off with the kind of speed and lift that lands it on top of your kitchen cabinets forever.
Why Some Bird Owners Choose to Clip
- It keeps the bird from escaping through open windows or doors
- It reduces injury from flying into glass or walls
- It makes the bird easier to handle, especially for new owners
- It encourages the bird to stay closer to you, which actually helps with bonding
- It is temporary because feathers grow back with the next molt
Why Some Bird Owners Choose Not to Clip
- Fully flighted birds get more natural exercise
- Some birds rely on flight for confidence and mental stimulation
- In multi-pet households, flight can help a bird escape a threatening situation
Neither choice is wrong. It depends on your bird’s personality, your home environment, and your personal preferences.
Knowing When Your Bird Needs a Clip
Birds molt regularly, and as new feathers grow in, your previously clipped bird will slowly regain flight capability.
You will usually notice your bird getting more airborne and a little more adventurous. That is your cue to check whether a trim is needed.
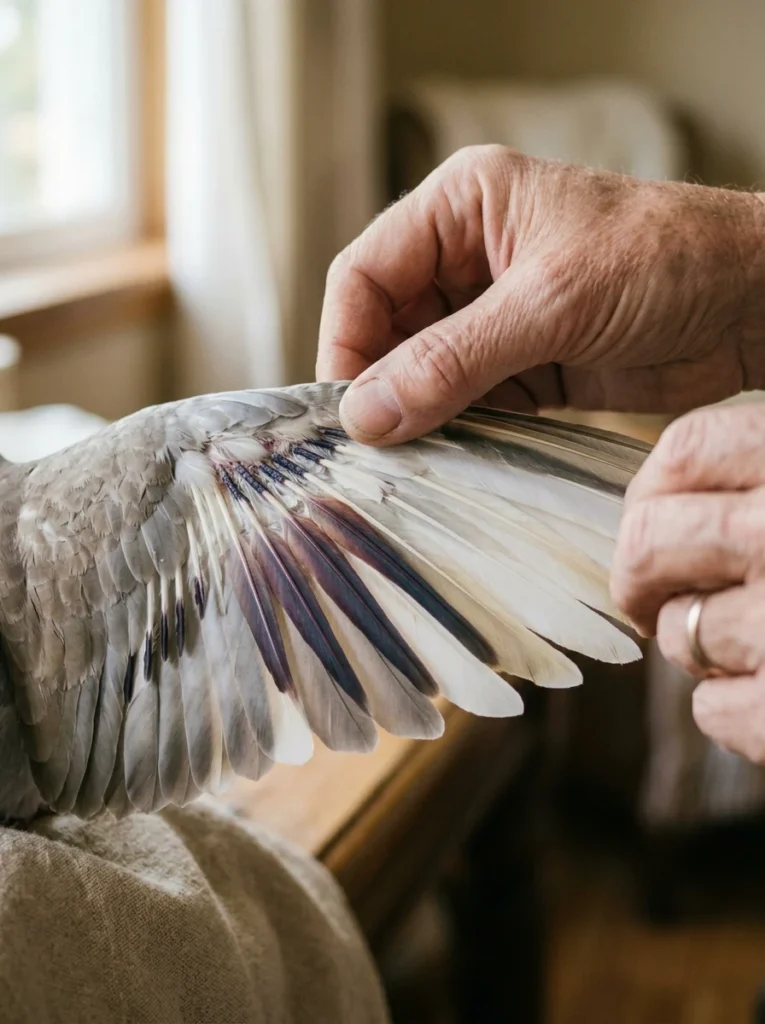
You should also inspect the wings periodically. Run your fingers gently along the feathers to feel for new growth.
Blood feathers, which are new feathers still developing with a blood supply, look darker at the base and have a slightly waxy appearance.
You should never clip a blood feather. If you accidentally do, it can cause significant bleeding and needs to be handled immediately.
A general rule of thumb: most birds need a clip every two to three months, but this varies widely by species and individual bird.
Tools You Need Before You Start
You would not try to cook a meal without the right equipment, and the same applies here. Get your tools ready before you bring your bird into the situation.
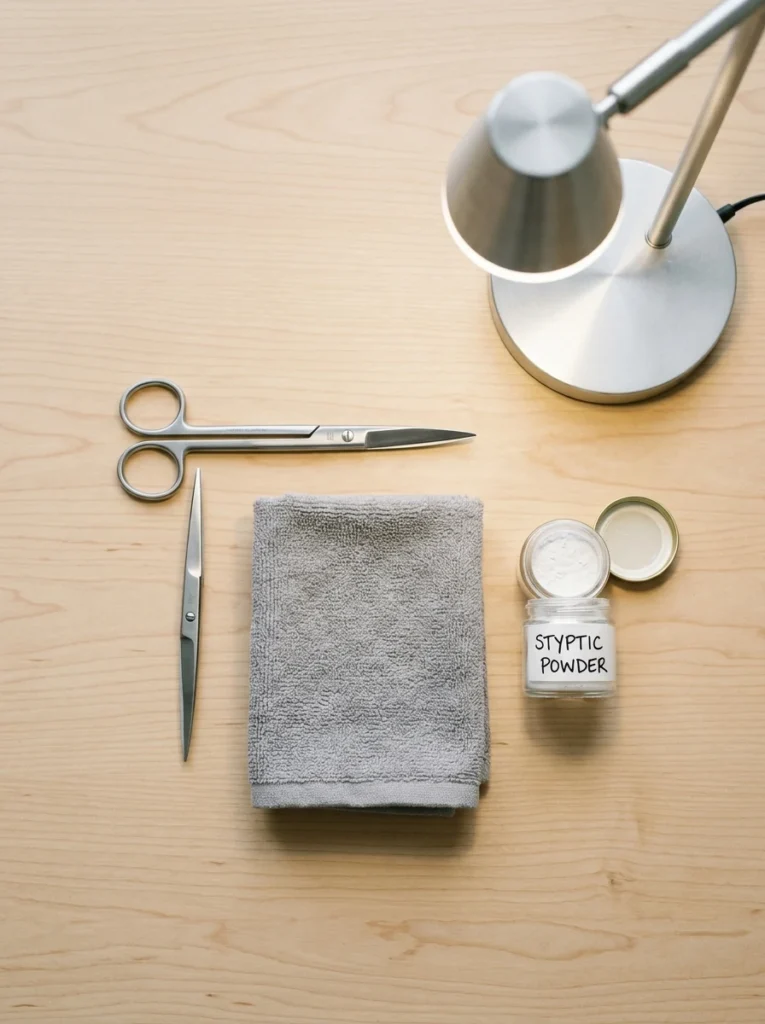
Here is what you need:
- Sharp, straight-blade scissors specifically for bird use. Dull scissors crush rather than cut, and that is painful.
- A towel for gentle restraint
- Styptic powder or cornstarch in case you accidentally nick a blood feather
- A second person if you can arrange it. One person holds, one person cuts. It is so much easier this way.
- Good lighting so you can clearly see what you are working with
Shop Bird Wing Clipping Scissors and Grooming Tools on Amazon
Avoid using regular household scissors. They are not sharp enough and the blades are often too wide to give you clean, precise cuts.
How to Restrain Your Bird Safely
Restraint is where most people tense up, and that tension passes straight to your bird. Birds are remarkably good at reading your energy, so if you are panicking, your bird will panic too.
The Towel Method
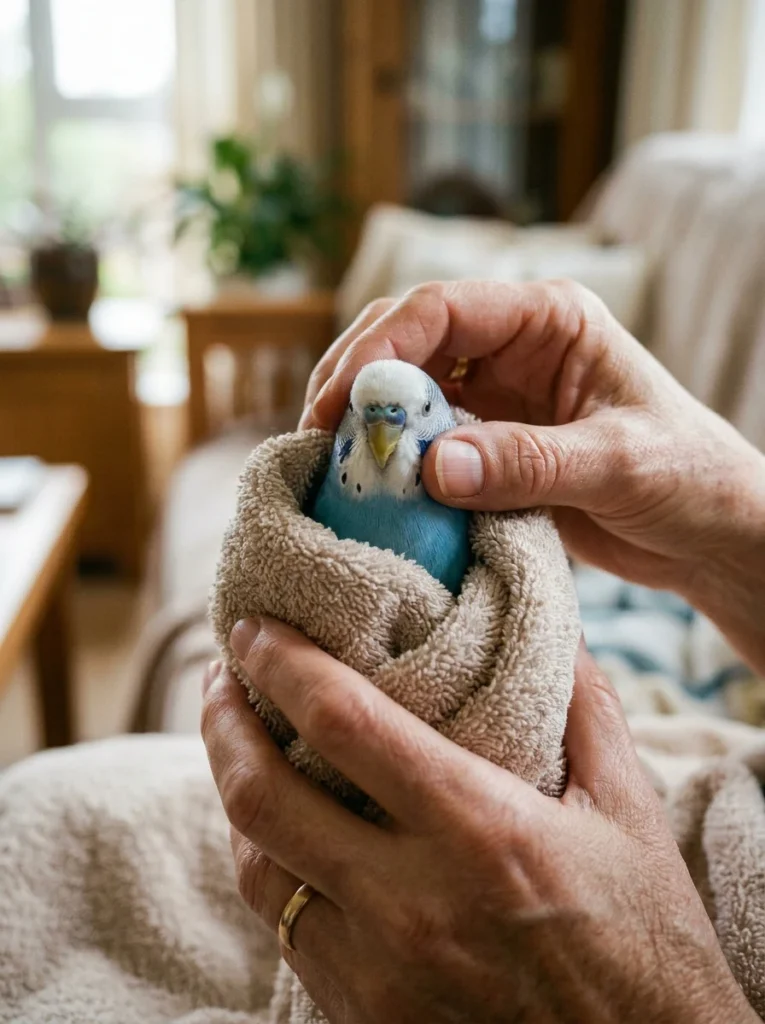
Wrap your bird loosely but securely in a small towel. The goal is to limit wing movement without putting pressure on the chest.
Birds breathe using their chest muscles, so never squeeze around the body tightly. A bird that cannot breathe properly will go into distress very quickly.
Hold the bird with one hand supporting the head between your thumb and forefinger, and the other hand supporting the body.
Your grip should be firm enough to prevent thrashing but gentle enough that the bird is not struggling to breathe.
If your bird is small, like a budgie or a parrot, one person can often manage this alone.
For larger birds like African Greys or cockatoos, a second set of hands makes the entire process safer and calmer for everyone involved.
Find Soft Bird Handling Towels and Restraint Supplies on Amazon
Step-by-Step: How to Clip Your Bird’s Wings
Now for the part you actually came here for. Follow these steps carefully the first few times until you feel comfortable.
Step 1: Extend One Wing Gently
Hold the bird securely with the towel and use your free hand to gently extend one wing outward.
You want to see the full spread of the primary flight feathers, which are the long feathers at the outermost edge of the wing.
Step 2: Identify the Primary Flight Feathers
The primary flight feathers are the ten longest feathers at the tip of the wing. These are the feathers you will trim. The secondary feathers sit closer to the body and you generally leave those alone.
Take a moment to check for blood feathers. A blood feather has a dark, purplish shaft at the base compared to the white or clear shaft of a mature feather. If you see one, avoid it entirely. Clip around it.
Step 3: Decide How Many Feathers to Clip
For most pet birds, clipping between six and eight primary feathers on each wing provides enough reduction in flight to keep the bird safe while still allowing some glide.
Clipping fewer feathers gives a lighter trim, while clipping all ten creates a heavier restriction.
New to this? Start with six feathers and see how your bird responds over the following days.
Step 4: Cut at the Right Point
Cut the feathers at a point just below where the overlying covert feathers end.
This means the cut edge will be hidden under those shorter feathers, which gives a cleaner look and avoids leaving sharp, pokey stubs that can irritate your bird.
Cut one feather at a time. Do not rush. If your scissors feel like they are dragging rather than cutting cleanly, stop and swap to a sharper pair.
Step 5: Repeat on the Other Wing
Always clip both wings. Clipping only one wing throws off your bird’s balance and can actually cause falls or awkward crash landings that lead to injury.
The goal is a balanced, controlled glide, not a spiral nosedive.
Step 6: Release and Observe
Once you finish both wings, release your bird and let it settle. Offer a treat and some calm reassurance.
Watch how it moves and flutters for the next several minutes to make sure it is balancing well and not in distress.
What to Do If You Cut a Blood Feather
Cutting a blood feather is every bird owner’s nightmare, but it happens. If it does, stay calm.
Here is what to do:
- Apply styptic powder or cornstarch directly to the shaft to help stop the bleeding
- Apply gentle pressure with a clean cloth for a minute or two
- Monitor the bird closely
If the bleeding does not stop within five to ten minutes, or if the feather continues to bleed when the bird moves, that blood feather may need to be pulled out entirely.
This is a procedure best done by a vet, so call your avian vet if you are not confident doing it yourself.
A blood feather that keeps bleeding is not something to wait out. Get help.
Shop Styptic Powder and Bird First Aid Essentials on Amazon
After the Clip: What to Expect
Your bird might seem a little subdued or off-balance for the first day or two. That is normal. It is adjusting to its new center of gravity, essentially.
Give it extra attention, keep it away from high perches until it finds its footing, and make sure it has safe, low landing spots.
Some birds get a little grumpy after a clip. If your bird suddenly decides your finger is a chew toy, take it as a hint that it needs a day to decompress.
Not every bird forgives immediately, and that is okay.
Within a week, most birds adjust completely and you will not notice any behavioral difference.
How Often Should You Clip?
This depends on your specific bird. As a baseline:
- Small birds like budgies and cockatiels: Every two to three months
- Medium birds like conures and caiques: Every two to four months
- Large birds like cockatoos and macaws: Every three to five months
Watch for the signs rather than sticking rigidly to a schedule. When you notice your bird flying higher and more confidently than you are comfortable with, it is time to check.
When to Call a Vet Instead
Sometimes the best decision is to admit the job is above your comfort level and take your bird to a professional. There is absolutely no shame in this.
You should consult your avian vet if:
- Your bird has a large number of blood feathers coming in at once
- Your bird has a medical condition affecting its feathers or skin
- You are not confident in restraining your bird safely
- Your bird reacts with extreme stress or aggression during handling
A good avian vet can also show you the technique in person, which is genuinely the best first lesson you will ever get.
Watching someone experienced do it once is worth more than ten articles online, including this one.
Final Thoughts
Clipping your bird’s wings at home is a completely manageable skill once you get past the initial nerves.
The key ingredients are sharp scissors, calm energy, a secure hold, and a willingness to go slowly. Your bird does not need perfection from you. It just needs care.
The first time will feel awkward. The fifth time will feel routine.
And one day, you will be the person confidently explaining the whole process to a fellow bird owner who is standing in their kitchen, scissors in hand, looking absolutely terrified.
Pay the knowledge forward.
Your bird trusts you. That trust is the most important tool you have.
Does Wing Clipping Hurt My Pet Bird?
No, wing clipping does not hurt your bird when it is done correctly. Feathers do not have nerve endings, so cutting a mature feather causes no pain.
The only exception is a blood feather, which is a new feather still actively growing with a blood supply running through its shaft.
Cutting a blood feather can cause bleeding and discomfort, which is why you must always inspect each feather before you cut.
A proper clip should be quick, clean, and stress-free for your bird.
How Many Feathers Should I Clip on My Bird’s Wings?
For most pet birds, clipping six to eight primary flight feathers on each wing strikes the right balance.
This reduces your bird’s ability to gain altitude and fly long distances while still allowing it to glide and land safely.
If you are doing this for the first time, start with six feathers and observe how your bird moves over the following days.
You can always trim a little more if needed, but you cannot put feathers back once you cut them.
How Often Does a Pet Bird Need Its Wings Clipped?
The frequency depends on your bird’s species and how quickly it molts.
As a general guide, small birds like budgies and cockatiels need a clip every two to three months, medium birds like conures need one every two to four months, and larger birds like cockatoos and macaws typically need a clip every three to five months.
Rather than following a strict calendar, watch for signs that your bird is regaining strong flight capability and use that as your cue to check the feathers.
What Should I Do If My Bird’s Clipped Wing Bleeds?
If you accidentally cut a blood feather and it starts to bleed, apply styptic powder or plain cornstarch directly to the feather shaft and hold gentle pressure against it with a clean cloth for one to two minutes.
Monitor your bird closely after that.
If the bleeding continues beyond five to ten minutes, or if the feather keeps bleeding whenever the bird moves or flaps, the blood feather may need to be professionally removed by an avian vet.
Do not delay seeking help if the bleeding will not stop.
Should I Clip One Wing or Both Wings When Grooming My Bird at Home?
You should always clip both wings, never just one.
Clipping only one wing creates an imbalance that throws off your bird’s ability to steer and land properly, which significantly increases the risk of crash landings and injury.
The goal of wing clipping is a controlled, gentle glide, and that requires symmetry on both sides.
Clipping both wings evenly keeps your bird safer and makes the adjustment period after the clip much smoother for the bird.